
This post contains affiliate links, meaning we may earn a small commission if you purchase through our links—at no extra cost to you. We only recommend kitchen tools, ingredients, and supplements we trust and use ourselves!
There was a time when I used to buy bread from the store without a second thought. It was convenient, after all—why go through the trouble of making my own when I could just pick up a loaf? But that all changed the day I made this Soft and Crispy Crust Bread for the first time.
It was a chilly afternoon, and the house felt quiet. I had been craving the comforting warmth of fresh bread, but I had never considered myself a bread baker. Still, something about the simplicity of the ingredients called to me. I decided to try, kneading the dough by hand, feeling its soft elasticity take shape under my fingertips. As it rose, the kitchen filled with a subtle warmth, a quiet anticipation.
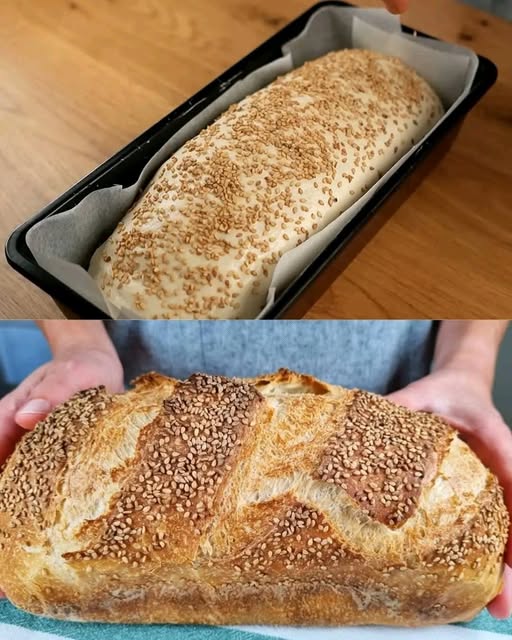
When the bread emerged from the oven—golden brown, crackling as it cooled—I couldn’t believe I had made it myself. I tore off a piece, the steam escaping as I spread a small pat of butter over the warm, fluffy interior. That first bite was a revelation: crisp on the outside, soft and airy inside, with a depth of flavor no store-bought bread could match.
Since that day, I haven’t bought a single loaf of bread. This recipe became a staple in my kitchen, not just for its incredible taste but for the way it transformed my relationship with baking. It’s fast, foolproof, and endlessly satisfying. If you’ve ever thought that making bread from scratch is too complicated, let this be the recipe that changes everything for you, too.
Why You’ll Love This Bread
1. Quick and Simple to Make
This bread doesn’t require hours of complicated techniques. With a few basic ingredients and minimal effort, you’ll have a fresh, homemade loaf in no time.
2. The Perfect Balance of Soft and Crispy
The inside is light and fluffy, while the crust has a beautiful crispiness that gives each bite a satisfying texture.
3. No Special Equipment Needed
You don’t need a fancy bread machine or mixer—just a bowl, your hands, and an oven.
4. Versatile and Customizable
This bread is delicious as is, but you can easily add seeds, herbs, or even cheese for a personalized touch.
5. Healthier Than Store-Bought
With no unnecessary preservatives or additives, this homemade bread is a much healthier option than most store-bought loaves.
Ingredients
| Ingredient | Amount |
|---|---|
| Water | ⅔ cup (160 ml) |
| Plain yogurt | ¼ cup (60 g) |
| Fresh yeast | 1 tsp (3 g) |
| or Dry yeast | ½ tsp (2 g) |
| Sugar | A pinch (to activate yeast) |
| Vegetable oil | 1 tbsp |
| All-purpose flour | 2 ½ cups (300 g) |
| Salt | 1 tsp |
Directions
1. Activate the Yeast
- Warm the water slightly (it should be lukewarm, not hot).
- Stir in the sugar and yeast, then let sit for 5-10 minutes until foamy.
2. Prepare the Dough
- In a large bowl, mix the flour and salt.
- Add the yogurt, oil, and activated yeast mixture.
- Knead the dough for about 10 minutes until smooth and elastic.
3. Let It Rise
- Cover the dough with a clean towel and let it rise in a warm place for about 1 hour or until doubled in size.
4. Shape and Bake
- Preheat the oven to 220°C (430°F).
- Shape the dough into a loaf or rolls and place it on a lined baking tray.
- Bake for 20-25 minutes, or until golden brown and crisp.
5. Serve and Enjoy
- Let the bread cool slightly before slicing.
- Enjoy warm with butter, jam, or your favorite spread!
Nutritional Information (Per Slice, Approx. 50g)
| Nutrient | Amount |
|---|---|
| Calories | ~120 |
| Protein | ~3g |
| Carbohydrates | ~22g |
| Fat | ~2g |
| Fiber | ~1g |
Frequently Asked Questions
1. Can I Use Dry Yeast Instead of Fresh Yeast?
Yes! If using dry yeast, reduce the amount slightly. Typically, ½ teaspoon of dry yeast is equivalent to 1 teaspoon of fresh yeast. Just make sure to activate it in warm water with a pinch of sugar before adding it to the dough.
2. What Type of Flour Works Best?
All-purpose flour works well, but if you want a heartier loaf, you can substitute half of the flour with whole wheat flour. Keep in mind that whole wheat flour absorbs more liquid, so you may need to add a little extra water.
3. How Do I Get an Even Crispier Crust?
To enhance the crispiness of the crust, place a small oven-safe dish filled with water on the lower rack of your oven while baking. The steam will help create a crunchier texture.
4. Can I Make This Bread Dairy-Free?
Yes! Simply replace the plain yogurt with an equal amount of dairy-free yogurt or unsweetened almond milk. The texture may be slightly different, but the bread will still turn out soft and delicious.
5. How Long Does This Bread Stay Fresh?
This bread is best enjoyed fresh on the day it’s made. However, you can store it in an airtight container at room temperature for up to two days. If you need to keep it longer, slice and freeze it, then reheat slices in the oven or toaster when needed.
6. Can I Double the Recipe?
Absolutely! This recipe doubles easily. Just make sure to divide the dough into two loaves for even baking.
7. Can I Let the Dough Rise Overnight?
Yes! If you want to prepare the dough in advance, let it rise in the refrigerator overnight. This slow fermentation enhances the flavor of the bread. When ready to bake, let the dough come to room temperature before shaping and baking.
8. Can I Turn This Into Dinner Rolls Instead?
Yes! Instead of shaping the dough into a loaf, divide it into smaller portions and bake them as rolls. Reduce the baking time to about 15-18 minutes.
The Science Behind the Perfect Bread Texture
One of the key reasons this bread achieves its soft inside and crispy crust lies in the balance of ingredients:
- Yogurt: The acidity in yogurt helps tenderize the dough, making the interior incredibly soft.
- Oil: A little oil keeps the bread moist while adding richness to the flavor.
- Steam: If you add steam to your oven while baking, it prevents the crust from setting too quickly, allowing for an even rise before crisping up.
This combination of techniques ensures a loaf that is both deliciously airy and wonderfully crisp.
Tips for the Best Homemade Bread
- Knead the Dough Well: Kneading develops the gluten, which gives the bread its structure. Aim for about 10 minutes of kneading until the dough is smooth and elastic.
- Don’t Rush the Rise: Let the dough double in size for the best texture. If your kitchen is cold, place the bowl in a slightly warm oven (turned off) to speed up the process.
- Use a Preheated Oven: Baking at a high temperature ensures the bread rises properly and the crust crisps up beautifully.
- Let It Cool Before Slicing: It’s tempting to cut into fresh bread immediately, but letting it cool helps the interior set properly and prevents it from becoming gummy.
Conclusion: The Bread That Will Change the Way You Bake
Baking your own bread isn’t just about making something delicious—it’s about reconnecting with the process of creating food from scratch. There is something truly satisfying about watching simple ingredients transform into a warm, golden loaf.
This Soft and Crispy Crust Bread is proof that making bread at home doesn’t have to be intimidating or time-consuming. It’s quick, easy, and so good that once you try it, you might never want to buy store-bought bread again.
So, roll up your sleeves, gather your ingredients, and experience the joy of baking fresh bread. Whether you enjoy it warm with butter, dipped in olive oil, or as the foundation for your favorite sandwich, one thing is certain—you’ll never look at bread the same way again.
Golden Crust Perfection: The Quick and Easy Soft & Crispy Bread
Say goodbye to store-bought bread! This Soft and Crispy Crust Bread is incredibly easy to make and delivers bakery-quality results in no time. With a light and airy interior and a perfectly golden, crispy crust, this homemade bread is perfect for sandwiches, dipping, or simply enjoying warm with butter. No special equipment is needed—just simple ingredients and a little kneading.
- Prep Time: 15 minutes
- 1 hour:
- Cook Time: 25 minutes
- Total Time: 1 hour 40 minutes
- Yield: 6 rolls 1x
- Category: Bread
- Method: Baking
- Cuisine: European
Ingredients
- ⅔ cup (160 ml) warm water
- ¼ cup (60 g) plain yogurt
- 1 tsp (3 g) fresh yeast or ½ tsp (2 g) dry yeast
- A pinch of sugar (to activate the yeast)
- 1 tbsp vegetable oil
- 2 ½ cups (300 g) all-purpose flour
- 1 tsp salt
Instructions
-
Activate the Yeast
- In a small bowl, mix warm water with sugar and yeast. Let sit for 5-10 minutes until foamy.
-
Prepare the Dough
- In a large bowl, combine flour and salt. Add yogurt, oil, and activated yeast mixture.
- Knead the dough for about 10 minutes until smooth and elastic.
-
Let It Rise
- Cover the dough with a towel and let it rise in a warm place for about 1 hour, or until doubled in size.
-
Shape and Bake
- Preheat the oven to 220°C (430°F).
- Shape the dough into a loaf or rolls and place on a lined baking tray.
- Bake for 20-25 minutes until golden brown and crispy on the outside.
-
Cool and Serve
- Allow the bread to cool slightly before slicing.
- Serve warm with butter, honey, or your favorite spreads.
Notes
- Ensure the water is warm (not hot) to properly activate the yeast.
- For a crispier crust, place a small dish of water in the oven while baking.
- Store in an airtight container at room temperature for up to 2 days or freeze for longer storage.